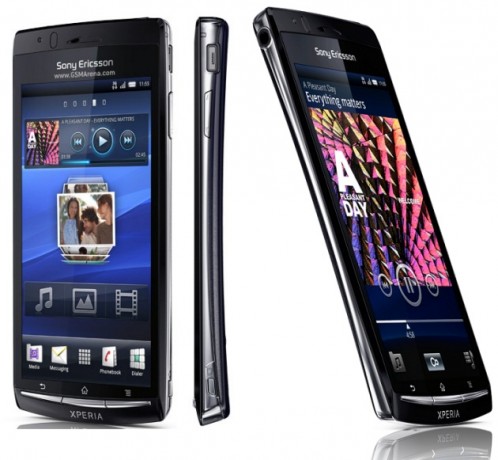
The Sony Xperia Arc comes with a 4.2-inch LCD display, a 8MP
shooter and a 1GHz Scorpion processor keeping things running at its
mid-range speed. The device recently saw an update to Android 4.0.4
officially but there’s no word as yet on whether there will be an
official Jelly Bean upgrade. Until then, there are custom ROMs to try
out and to do that, your Arc will need to be rooted. This post below
will help you do that.
2. The guide below is designed to work on Windows PCs (preferably Windows 7); sorry Mac/Linux users!
3. Back up everything you feel is important before you begin.
4. This procedure is designed to work on Xperia Arc devices running firmware v4.1.B.0.587. So make sure this is the firmware versions you are running before you proceed.
2. Lt18i_4.1.A.0.562_Kernel.ftf (Link available in the first post under the Downloads section)
3. DooMLoRD_v1_Xperia-2011-ICS-ROOT-emu-busybox-su.zip (Link available in the first post)
2. Copy Lt18i_4.1.A.0.562_Kernel.ftf file you downloaded above to C:\Flashtool\firmwares on your harddrive.
3. Open the Flashtool application after installation and click on the Flash icon (the one with the thunder symbol).
4. You should be presented with two options: Flashmode and Fastboot Mode. Select Flashmode.
5. Choose Lt18i_4.1.A.0.562 and click on OK. Follow the on-screen instructions on how to boot your device into fastboot mode and connect your device. Also, make sure”No Final Verification” is marked.
6. Reboot device.
2. Enable installation of non-Market applications. To do this, go to Settings > Applications and check the Unknown Sources tickbox.
3. Enable MSC Mode. Go to Settings > Xperia > Connectivity > USB Connection Mode and select MSC Mode.
4. Connect your device to your Windows PC.
5. Extract the DooMLoRD_v1_Xperia-2011-ICS-ROOT-emu-busybox-su.zip that you downloaded above to a folder on your desktop.
6. From the extracted folder, double-click on runme.bat to run the DooMLoRD tool.
7. Follow the on-screen instructions and wait for the process to be complete (your device will reboot several times during the procedure).
If this procedure helped you please thank/donate to the original developers here.
If you need help with this procedure, please ask in the comments below or in the forum.
This is part of our Android How To’s. We have how to’s on rooting, loading ROMs, and tons of other tips and tricks for your specific device or for Android devices in general! For all of our Android How To’s, head here.
I. Before You Begin
1. Make sure that your device is at least 75% charged.2. The guide below is designed to work on Windows PCs (preferably Windows 7); sorry Mac/Linux users!
3. Back up everything you feel is important before you begin.
4. This procedure is designed to work on Xperia Arc devices running firmware v4.1.B.0.587. So make sure this is the firmware versions you are running before you proceed.
II. Necessary Downloads
1. Flashtool v0.8.6.0.2. Lt18i_4.1.A.0.562_Kernel.ftf (Link available in the first post under the Downloads section)
3. DooMLoRD_v1_Xperia-2011-ICS-ROOT-emu-busybox-su.zip (Link available in the first post)
III. Flashing the .562 Kernel
1. Double-click on flashtool.exe you downloaded above and follow the on-screen instructions to install it.2. Copy Lt18i_4.1.A.0.562_Kernel.ftf file you downloaded above to C:\Flashtool\firmwares on your harddrive.
3. Open the Flashtool application after installation and click on the Flash icon (the one with the thunder symbol).
4. You should be presented with two options: Flashmode and Fastboot Mode. Select Flashmode.
5. Choose Lt18i_4.1.A.0.562 and click on OK. Follow the on-screen instructions on how to boot your device into fastboot mode and connect your device. Also, make sure”No Final Verification” is marked.
6. Reboot device.
V. Rooting the Xperia Arc
1. Enable USB Debugging on your device. You can do this by heading to Settings > Applications > USB Debugging and checking the tickbox next to it.2. Enable installation of non-Market applications. To do this, go to Settings > Applications and check the Unknown Sources tickbox.
3. Enable MSC Mode. Go to Settings > Xperia > Connectivity > USB Connection Mode and select MSC Mode.
4. Connect your device to your Windows PC.
5. Extract the DooMLoRD_v1_Xperia-2011-ICS-ROOT-emu-busybox-su.zip that you downloaded above to a folder on your desktop.
6. From the extracted folder, double-click on runme.bat to run the DooMLoRD tool.
7. Follow the on-screen instructions and wait for the process to be complete (your device will reboot several times during the procedure).
V. Flashing Custom Recovery (Optional)
If you would like to flash a custom recovery image in order to flash custom ROMs, head to the next procedure to learn how to do that.If this procedure helped you please thank/donate to the original developers here.
If you need help with this procedure, please ask in the comments below or in the forum.
This is part of our Android How To’s. We have how to’s on rooting, loading ROMs, and tons of other tips and tricks for your specific device or for Android devices in general! For all of our Android How To’s, head here.
No comments:
Post a Comment